Building An Image Classifier
Jun 16, 2022
Introduction.
In this article, I will guide you through the processes I went through to create an image classifier using the Flask framework, the Keras library and Google’s popular machine learning library, Tensorflow. It was quite an interesting project that managed to gain over nineteen stars on Github, as at the time of writing this article. I was really pleased with the project, thus I humbly decided to share the entire workflow.
My System Specifications.
I love to classify my system specifications as minimalistic to engage in training neural networks and machine learning models. I use a hewlett-packard machine that runs the Linux Operating System, specifically Ubuntu, which is a fantastic debian-based distribution that I cannot just abandon for other alternatives. Below are my specifications:
- Intel Core i7 (10th Generation).
- Nvidia GeForce, 2GB GPU.
- 8GB RAM.
- 250GB SSD plus 1TB of HHD.
The Importance of GPUS.
The Graphic Processing Unit, abbreviated as GPU, is a unique electronic circuit that offers parallel processing and is used to accelerate the rendering of computer graphics. GPUs are implemented within the deep learning space to to accelerate training and inference for resource and computationally intensive models. Their importance cannot be overemphasized as they contain specialized cores unlike a CPU that distribute the workload or computation across each unit to deliver a much faster performance. So I really recommend using a system with GPU to train models. I had to destroy my wallet to get a GPU machine, but it was worth it.
I suggest you purchase some cloud based solutions that would give you access into a cluster or instance of compute that provides adequate GPU that would suffice for a specific task. There are several cloud providers available for this purpose.
Getting Started.
First and foremost, we need to satisfy some requirements otherwise the installation of certain dependencies that are pertinet to building the platform. Hence, we must review the context of the project and understand the reason for the selected tools for the project.
Tensorflow: Tensorflow is Google’s open source machine learning library used internally as well for their Machine Learning driven solutions.Keras: This is a python based interface that acts as a layer on top of TensorFlow, to ease the abstraction and improve the implementation.Flask: This is a fantastic microframework used for building web applications written in Python. It has always been my preferred approach to developing scalable RESTful APIs in Python, over Django.Pip: This is the official package manager for Python which provides the above libraries hosted on Python’s open source library platform.
The Model.
One significant thing to note is that we are not explicitly writing a machine learning model from scratch. That would be quite exhausting. Why reinvent the wheel when you have already trained models available to integrate? Hell no.
So for our prestigious model, which I cherry-picked from several options and sources. It is called the “VGG16.”
It sounds like a rocket model crafted for another adventure into the solar system. Or a codename for a russian spy. As ludicrous as it may seem, the name of the model played an agurably important role in grabbing my attention.
The VGG16 Model.
I truly believe in the importance of reviewing academic papers that cite or basically illustrate the entire context of the model available. Therefore, I was able to obtain some pretty cool sources. I suggest this paper. It was very intriguing
VGG16 refers to the VGG model, also called VGGNet. It is a convolution neural network (CNN) model supporting 16 layers. So basically, the VGG16 model is a convolution neural network designed primarily for the sole purpose of localization and classification. It supports up to sixteen perceptron layers. Neural networks are made up of components called layers.
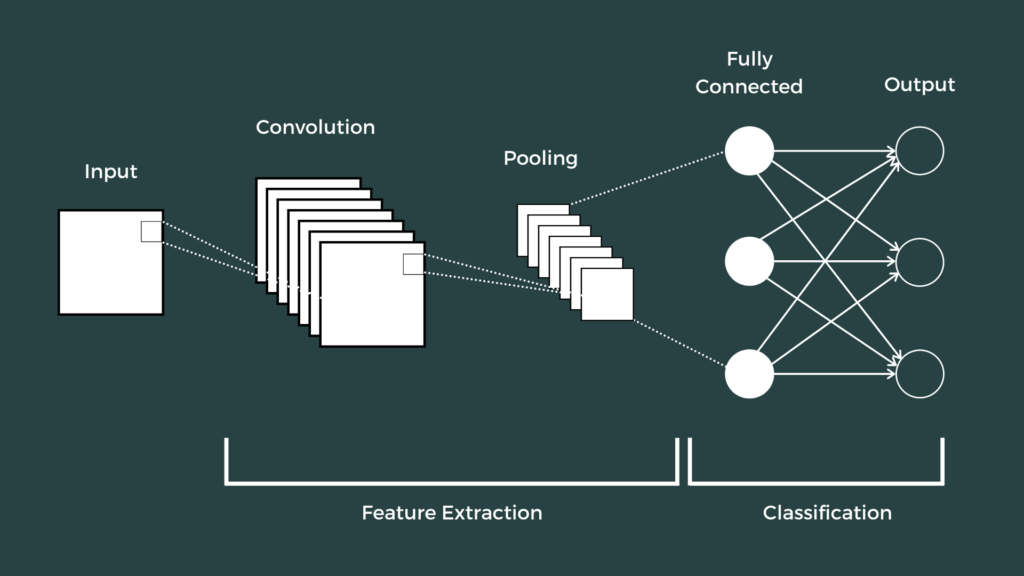
Image Credit: The Click Reader
For instance the covolutional neural network consists of three layers, primarily the pooling layer, activation layer and covolutional layer, with these three layers containing a speficic amount of weighted input that can be received. I do not want to go over neural networks here, I have a seperate article for that in theory. So I may appear quite evasive of the concepts I may subconciously instigate possibly as a means of clarifications to solidify my propositions and explanations.
So let us do more fun stuff. Try and capture the below diagramatical represenation of the VGG16 Model.
The VGG15 Model Architecture.

The VGG16 is composed of \(13\) convolutional layers, \(5\) max-pooling layers, and \(3\) fully connected layers. The number of layers with tunable parameters sums up to a total of \(16\). Giving it the number preceding the name.
The number of filters in the first block as shown is \(64\). The number is doubled in the subsequent blocks until it gets to \(512\). The model ends with two connected hidden layers, each containing \(4096\) neurons. The output layer contains a total of \(1000\) neurons corresponding to the number of categories in the ImageNet dataset.
We would implement the following algorithm in the project. It is worthy to note that the source code was obtained from the Keras Team. The reference to the same paper I cited is coincidentally referenced in the code.
"""VGG16 model for Keras.

# Reference

- [Very Deep Convolutional Networks for Large-Scale Image Recognition](
    https://arxiv.org/abs/1409.1556) (ICLR 2015)

"""
from __future__ import absolute_import
from __future__ import division
from __future__ import print_function

import os

from . import get_submodules_from_kwargs
from . import imagenet_utils
from .imagenet_utils import decode_predictions
from .imagenet_utils import _obtain_input_shape

preprocess_input = imagenet_utils.preprocess_input

WEIGHTS_PATH = ('https://github.com/fchollet/deep-learning-models/'
                'releases/download/v0.1/'
                'vgg16_weights_tf_dim_ordering_tf_kernels.h5')
WEIGHTS_PATH_NO_TOP = ('https://github.com/fchollet/deep-learning-models/'
                       'releases/download/v0.1/'
                       'vgg16_weights_tf_dim_ordering_tf_kernels_notop.h5')


def VGG16(include_top=True,
          weights='imagenet',
          input_tensor=None,
          input_shape=None,
          pooling=None,
          classes=1000,
          **kwargs):
    """Instantiates the VGG16 architecture.

    Optionally loads weights pre-trained on ImageNet.
    Note that the data format convention used by the model is
    the one specified in your Keras config at `~/.keras/keras.json`.

    # Arguments
        include_top: whether to include the 3 fully-connected
            layers at the top of the network.
        weights: one of `None` (random initialization),
              'imagenet' (pre-training on ImageNet),
              or the path to the weights file to be loaded.
        input_tensor: optional Keras tensor
            (i.e. output of `layers.Input()`)
            to use as image input for the model.
        input_shape: optional shape tuple, only to be specified
            if `include_top` is False (otherwise the input shape
            has to be `(224, 224, 3)`
            (with `channels_last` data format)
            or `(3, 224, 224)` (with `channels_first` data format).
            It should have exactly 3 input channels,
            and width and height should be no smaller than 32.
            E.g. `(200, 200, 3)` would be one valid value.
        pooling: Optional pooling mode for feature extraction
            when `include_top` is `False`.
            - `None` means that the output of the model will be
                the 4D tensor output of the
                last convolutional block.
            - `avg` means that global average pooling
                will be applied to the output of the
                last convolutional block, and thus
                the output of the model will be a 2D tensor.
            - `max` means that global max pooling will
                be applied.
        classes: optional number of classes to classify images
            into, only to be specified if `include_top` is True, and
            if no `weights` argument is specified.

    # Returns
        A Keras model instance.

    # Raises
        ValueError: in case of invalid argument for `weights`,
            or invalid input shape.
    """
    backend, layers, models, keras_utils = get_submodules_from_kwargs(kwargs)

    if not (weights in {'imagenet', None} or os.path.exists(weights)):
        raise ValueError('The `weights` argument should be either '
                         '`None` (random initialization), `imagenet` '
                         '(pre-training on ImageNet), '
                         'or the path to the weights file to be loaded.')

    if weights == 'imagenet' and include_top and classes != 1000:
        raise ValueError('If using `weights` as `"imagenet"` with `include_top`'
                         ' as true, `classes` should be 1000')
    # Determine proper input shape
    input_shape = _obtain_input_shape(input_shape,
                                      default_size=224,
                                      min_size=32,
                                      data_format=backend.image_data_format(),
                                      require_flatten=include_top,
                                      weights=weights)

    if input_tensor is None:
        img_input = layers.Input(shape=input_shape)
    else:
        if not backend.is_keras_tensor(input_tensor):
            img_input = layers.Input(tensor=input_tensor, shape=input_shape)
        else:
            img_input = input_tensor
    # Block 1
    x = layers.Conv2D(64, (3, 3),
                      activation='relu',
                      padding='same',
                      name='block1_conv1')(img_input)
    x = layers.Conv2D(64, (3, 3),
                      activation='relu',
                      padding='same',
                      name='block1_conv2')(x)
    x = layers.MaxPooling2D((2, 2), strides=(2, 2), name='block1_pool')(x)

    # Block 2
    x = layers.Conv2D(128, (3, 3),
                      activation='relu',
                      padding='same',
                      name='block2_conv1')(x)
    x = layers.Conv2D(128, (3, 3),
                      activation='relu',
                      padding='same',
                      name='block2_conv2')(x)
    x = layers.MaxPooling2D((2, 2), strides=(2, 2), name='block2_pool')(x)

    # Block 3
    x = layers.Conv2D(256, (3, 3),
                      activation='relu',
                      padding='same',
                      name='block3_conv1')(x)
    x = layers.Conv2D(256, (3, 3),
                      activation='relu',
                      padding='same',
                      name='block3_conv2')(x)
    x = layers.Conv2D(256, (3, 3),
                      activation='relu',
                      padding='same',
                      name='block3_conv3')(x)
    x = layers.MaxPooling2D((2, 2), strides=(2, 2), name='block3_pool')(x)

    # Block 4
    x = layers.Conv2D(512, (3, 3),
                      activation='relu',
                      padding='same',
                      name='block4_conv1')(x)
    x = layers.Conv2D(512, (3, 3),
                      activation='relu',
                      padding='same',
                      name='block4_conv2')(x)
    x = layers.Conv2D(512, (3, 3),
                      activation='relu',
                      padding='same',
                      name='block4_conv3')(x)
    x = layers.MaxPooling2D((2, 2), strides=(2, 2), name='block4_pool')(x)

    # Block 5
    x = layers.Conv2D(512, (3, 3),
                      activation='relu',
                      padding='same',
                      name='block5_conv1')(x)
    x = layers.Conv2D(512, (3, 3),
                      activation='relu',
                      padding='same',
                      name='block5_conv2')(x)
    x = layers.Conv2D(512, (3, 3),
                      activation='relu',
                      padding='same',
                      name='block5_conv3')(x)
    x = layers.MaxPooling2D((2, 2), strides=(2, 2), name='block5_pool')(x)

    if include_top:
        # Classification block
        x = layers.Flatten(name='flatten')(x)
        x = layers.Dense(4096, activation='relu', name='fc1')(x)
        x = layers.Dense(4096, activation='relu', name='fc2')(x)
        x = layers.Dense(classes, activation='softmax', name='predictions')(x)
    else:
        if pooling == 'avg':
            x = layers.GlobalAveragePooling2D()(x)
        elif pooling == 'max':
            x = layers.GlobalMaxPooling2D()(x)

    # Ensure that the model takes into account
    # any potential predecessors of `input_tensor`.
    if input_tensor is not None:
        inputs = keras_utils.get_source_inputs(input_tensor)
    else:
        inputs = img_input
    # Create model.
    model = models.Model(inputs, x, name='vgg16')

    # Load weights.
    if weights == 'imagenet':
        if include_top:
            weights_path = keras_utils.get_file(
                'vgg16_weights_tf_dim_ordering_tf_kernels.h5',
                WEIGHTS_PATH,
                cache_subdir='models',
                file_hash='64373286793e3c8b2b4e3219cbf3544b')
        else:
            weights_path = keras_utils.get_file(
                'vgg16_weights_tf_dim_ordering_tf_kernels_notop.h5',
                WEIGHTS_PATH_NO_TOP,
                cache_subdir='models',
                file_hash='6d6bbae143d832006294945121d1f1fc')
        model.load_weights(weights_path)
        if backend.backend() == 'theano':
            keras_utils.convert_all_kernels_in_model(model)
    elif weights is not None:
        model.load_weights(weights)

    return model
Building the project
Now we have an overview, we can commence the development of the image classifier, finally. The first thing I suggest you do is create a folder for the project.
sudo mkdir image-classifier
cd image-classifier
Create a virtual environment. This is relatively simple to do.
# Install on Ubuntu
sudo apt-get install python3-venv
python3 -m venv .venv
source .venv/bin/activate
Please ensure you fulfilled the requirements above. Ensure you have the Python programming language installed. Now we would neet to set up our dependencies.
sudo apt install pip3
python -m pip3 install --upgrade pip
pip3 install keras, flask, tensorflow

Create a file named app.py in the directory you created. This would be the main file that Flask will startup. Then append the following line of code to the app.py file:
from flask import Flask
app = Flask(__name__)
@app.route("/")
def home():
    return "Hello, Flask!"
Then run the following command: python -m flask run to boot up the application.
Creating the HTML template.
The application would need a front-end to run in the browser. Therefore to achieve this, we would need to create a template in HTML. You should be able to do this by first creating a folder called "template".
sudo mkdir template
touch app.html
sudo vi app.html
Then append the following code for the HTML template. We are using some Bootstrap for simple styling served through a content delivery network.
<!-- The Template: Gerald Maduabuchi -->
<!DOCTYPE html>
<html lang="en">
 <head>
  <title>Python Image Classification | Flask</title>
  <meta charset="utf-8" />
  <link rel="stylesheet" href="app.css" />
  <link
   rel="stylesheet"
   href="https://cdn.jsdelivr.net/npm/bootstrap@3.3.7/dist/css/bootstrap.min.css"
   integrity="sha384-BVYiiSIFeK1dGmJRAkycuHAHRg32OmUcww7on3RYdg4Va+PmSTsz/K68vbdEjh4u"
   crossorigin="anonymous"
  />
 </head>
 <body>
  <nav class="navbar navbar-default navbar-fixed-top nav">
   <a class="navbar-brand" href="app.html" aria-label="Go to home section"
    >Python Image Classification</a
   >
  </nav>
 </body>
 <form
  action="/"
  method="POST"
  enctype="multipart/form-data"
  class="form-style"
 >
  <div class="form-group">
   <label for="file image">Enter your Image</label>
   <input
    type="file"
    class="form-control"
    name="fileImage"
    placeholder="enter image"
   /><br />
   <input type="submit" value="Predict" class="btn btn-success" />
  </div>
 </form>
</html>
We created a form with a POST method to handle the submission of the image as an input from the browser to Flask, which would then leverage on the power of the VGG16 model to classify the image and return a prediction score. We would later implement the latter as we proceed.
Styling the Template.
For some extra styling, we would create an css/app.css then write the following styling otherwise rulesets to make our site look less ugly. I am still in the process of improving my front-end development skills, so bear with me the atrocious interface you may behold. It may be as generic as you think.
.form-style {
 padding-top: 25rem;
 width: 50rem;
 margin-left: 50rem;
}
input[type='file'] {
 color: red;
 padding-bottom: 3rem;
}
Model Implementation in Flask.
In your app.py we are going to write the basic logic, otherwise implementations of the VGG16 model in our application. It is quite straightforward, and does not in anyway represent the level of complexity we covered in the introductory section of the article.
# Importing flask module

from flask import Flask, render_template, request
First and foremost, you need to import the flask module which you installed by means of the pip tooling. Including the render_template to render the HTML template we wrote, as well as the request to retrieve requests from the client of our application.
Below, we carefully import the modules required for processing and the VGG16 model into the flask application. I will carefully elaborate on each import and its own contribution to the functionality.
- The
img_to_arraymodule is for converting a loaded image in PIL format into a NumPy array. - The
load_img, as the name implies is to load an image into the model. - The
preprocess_inputis meant to adequate the image to a format that the VGG16 requires. - The
VGG16module is the library or implementation itself that we would call into the application. - The
decode_predictionsis used to provide the prediction accuracy score, otherwise estimate.
# Importing Keras Modules

from keras.preprocessing.image import img_to_array
from keras.preprocessing.image import load_img
from keras.applications.vgg16 import preprocess_input
from keras.applications.vgg16 import VGG16
from keras.applications.vgg16 import decode_predictions
Now we need to write out new methods to start the application. We would also assign the VGG16 instansiation, to the variable model to represent the initialization across our codebase.
# Start App
app = Flask(__name__)

#The Model.
model = VGG16()
Next we would assign a sample route again, and write a function to render the app.html template accordingly. This could be done effectively by writing the below code:
# Get Route
@app.route('/', methods=['GET'])
def hello_world():
    #Render Template
    return render_template('app.html')
Now, this is where the entire logic is written. We would need to receive inputs from the post into the model.
# Receive input and post to model
@app.route('/', methods=['POST'])

# Predict function
def predict():
    fileImage = request.files['fileImage']
    image_path = "./images/" + fileImage.filename
    fileImage.save(image_path)
Here we request the image path, within the predict function we have written.
Loading the image.
Here we load the image into our application by calling the load_img method imported, passing the image_path as a parameter and the target size to conform to the requirements of the model.
#Load Image
    image = load_img(image_path, target_size=(224, 224))
    image = img_to_array(image)
    image = image.reshape((1, image.shape[0], image.shape[1], image.shape[2]))
Classification and Prediction.
Now we execute the prediction, and classification of the input. Then we return the prediction score to the app.html template.
    #Process Image
    image = preprocess_input(image)

    #Make Predictions
    yhat = model.predict(image)
    label = decode_predictions(yhat)
    label = label[0][0]

    #Make Classifications
    classification = '%s (%.2f%%)' % (label[1], label[2]*100)

    return render_template('app.html', prediction=classification)
Integrating to the Template.
Since we are using flask, we would need to call the prediction method by the following convention into our html template to fully integrate it.
<!-- Predict Function -->
{% if prediction %}
<small>The image you uploaded is a {{prediction}}</small>
{% endif %}
Excellent. I forgot. It is required to write in the initialization method for the flask application and assign a port number like so:
# Intitalise Port
if __name__ == '__main__':
    app.run(port=3000, debug=False)
Run python -m flask run to start the application.
Conclusion.
Did you get to the end solider? If you did, congratulations. You have successfully created a flask application that executes image recognition. Till the next time we meet. Have a nice day. Share the article and also, I am open to any suggestions. Also, feel free to explore the repository if it does not seem to work for you the way you want it to, follow the instructions and then you should be all set. Regards.